This article explains the mindset a full stack developer should build before getting started with Kubernetes, and how that mindset can be reinforced with a first realistic local lab.
The goal is not to memorize concepts. The goal is to read the system correctly. In Kubernetes, what usually makes the first steps difficult is not raw technical depth, but starting from the wrong mental model.
1. The Most Important Starting Idea
The biggest mistake a beginner makes is to think of Kubernetes as a single, uniform system. It is not. Kubernetes is a system with separated roles and rules.
That distinction should be clear from the beginning:
- Cluster = the full operating environment
- Node = a single machine inside the cluster
- Control plane = the side that manages
- Worker node = the side where applications run
If that distinction is missing, it becomes easy to think, “every node is the same, so it does not matter much where the scheduler places workloads.” In practice, it matters a lot.
If role separation, labels, taints, and placement rules are not designed clearly, unwanted Pods can land on unwanted nodes. In a weak setup, even the control plane can end up carrying unnecessary application load.
2. What Is a Cluster?
A cluster is the full system managed by Kubernetes. It includes the control plane and the worker nodes. In short, it is the main operating environment where containers and Kubernetes resources are managed together.
One cluster is usually independent from another. Each cluster has:
- its own nodes
- its own API server
- its own resources
- its own configuration
Examples of different local cluster contexts:
docker-desktopminikube
The most basic context commands are:
kubectl config current-context
kubectl config get-contexts
kubectl config use-context minikube
In medium-sized projects, a very common model is to keep dev and test in the same cluster while production stays in a separate cluster. The reason is simple: you usually want stronger isolation for production.
3. What Is a Node?
A node is a single machine or execution unit inside a cluster. It can be a physical server, a virtual machine, or a local lab node.
In short, it is the infrastructure unit where Pods actually run.
4. Control Plane vs. Worker Node
4.1 What is the control plane?
The control plane is the management center of Kubernetes. The state of the cluster is stored there, decisions are made there, and the desired state of the system is maintained there.
The critical components usually include:
kube-apiserveretcdkube-schedulerkube-controller-manager
In short, the control plane is the side that holds state, makes decisions, and manages the cluster.
4.2 What is a worker node?
A worker node is the side where applications actually run. Your backend, frontend, batch jobs, workers, or database Pods usually live there.
The main components on a worker node usually include:
kubelet- the container runtime
kube-proxyand other networking components
- The control plane manages.
- The worker node runs workloads.
5. Why the Control Plane Must Be Protected
The control plane is the management center of the cluster. If random application Pods land there, the management side takes unnecessary load and the cluster becomes noisier and harder to protect.
In many installations, this protection already exists as a taint. If it does not, you should add it yourself.
To check:
kubectl describe node dev-clusterLook at the Taints: section. If the control plane is not protected, add the taint manually:
kubectl taint nodes dev-cluster node-role.kubernetes.io/control-plane=true:NoScheduleThe meaning is simple: normal workloads without the proper toleration should not be scheduled onto the control plane.
6. Placement Logic: Labels, nodeSelector, nodeAffinity, Taints, Tolerations
6.1 What is a label?
A label is a tag attached to a node. It tells you what the node is for or which group it belongs to.
For example:
workload=app
workload=db
role=ingress
Short version: a label tells you the identity of a node.
6.2 What is nodeSelector?
nodeSelector is the simplest placement rule. A Pod can say, “I only want to run on nodes with this label.”
Example logic: if a node has the label workload=db, the Pod can say, “I should run only on nodes with workload=db.”
Short version: nodeSelector is the Pod’s simplest node targeting rule.
6.3 What is nodeAffinity?
nodeAffinity serves the same purpose as nodeSelector, but it lets you write more expressive and flexible rules.
- This Pod must go to a specific kind of node.
- This Pod should prefer a node type, but other suitable nodes are acceptable.
Short version: nodeAffinity describes node selection in a more flexible way.
6.4 What is a taint?
A taint is a restriction placed on a node. The node is effectively saying, “not every Pod is allowed here.”
The three effects worth knowing early are:
- NoSchedule: no new Pod is scheduled there without a matching toleration
- PreferNoSchedule: Kubernetes tries to avoid the node, but can still use it
- NoExecute: incompatible Pods may be blocked and even evicted
6.5 What is a toleration?
A toleration is special permission attached to a Pod. The taint protects the node; the toleration allows the Pod to pass that restriction.
- The node says: “not everyone can come here.”
- The Pod says: “I can tolerate that restriction.”
The critical detail is this: a toleration does not send a Pod to that node automatically. It only makes placement there possible.
- nodeSelector / affinity target the right node
- toleration allows entry to a protected node
6.6 The shortest summary
- Label identifies the node
- nodeSelector / affinity guide the Pod to the right node
- Taint blocks unwanted Pods from the node
- Toleration lets an approved Pod pass the restriction
7. What Is a Namespace?
A namespace is a logical separation mechanism inside the same cluster. It allows you to separate resources into areas such as dev, test, prod, or monitoring.
Short version: a namespace is a logical partition used to keep resources organized inside a cluster.
7.1 What is it useful for?
- It prevents resources from getting mixed together.
- It helps separate environments or teams inside the same cluster.
- It makes grouped listing, deletion, and management much easier.
7.2 Is a namespace a separate cluster?
No. A namespace is not a separate cluster. You are still inside the same cluster, using the same control plane, the same nodes, and the same infrastructure.
- Cluster = a separate environment
- Namespace = a logical separation inside the same cluster
7.3 What does a namespace separate?
- Pods
- Services
- Deployments
- ConfigMaps
- Secrets
- Jobs
- Ingress and many other namespaced resources
7.4 What does a namespace not separate?
A namespace alone does not separate:
- nodes
- the cluster itself
- the control plane
- the physical infrastructure
- which node a Pod lands on
Putting something into a production namespace does not mean it will automatically run on a production node. Node-level control still requires labels, nodeSelector or affinity, taints, and tolerations.
7.5 Basic namespace commands
kubectl get ns
kubectl get all -n dev
kubectl create namespace dev
kubectl delete namespace dev
8. Why Start with a Practical Lab?
Trying to understand every Kubernetes concept at once creates unnecessary cognitive load. A smaller but realistic lab is far more useful because it lets you see the concepts in action.
Docker Desktop is enough for the first lab. Here, I use Minikube on top of Docker Desktop because it gives a small but realistic local Kubernetes environment. More importantly, it lets us see a control plane plus worker-node setup instead of only a single node view.
9. What Will This Lab Build?
- create the cluster from scratch
- start a multi-node Minikube cluster
- keep the control plane away from normal workloads
- assign clear roles to worker nodes
- separate workloads by namespace
- understand why Pods land on specific nodes
- run PostgreSQL as a real stateful workload
- connect to the database through Adminer
- inspect the cluster visually with Headlamp
10. Lab Architecture
The target setup looks like this:
- Cluster:
dev-cluster - Nodes:
dev-cluster→ control planedev-cluster-m02→ dev workerdev-cluster-m03→ test worker
- Namespaces:
devtestheadlamp
- Workloads:
- dev namespace → PostgreSQL StatefulSet + Adminer
- test namespace → PostgreSQL StatefulSet + Adminer
- headlamp namespace → Headlamp
11. Create a Working Directory
mkdir -p ~/k8s-lab
cd ~/k8s-lab
12. Create the Cluster from Scratch
12.1 Delete any old cluster
minikube delete -p dev-cluster12.2 Start the new cluster
minikube start -p dev-cluster --nodes 3 --driver=docker12.3 Switch to the correct context
kubectl config use-context dev-cluster
kubectl config current-context
12.4 Check the nodes
kubectl get nodes
kubectl get nodes -o wide
13. Enable the Storage Addons
minikube addons enable storage-provisioner -p dev-cluster
minikube addons enable default-storageclass -p dev-cluster
kubectl get storageclass
14. Give the Worker Nodes Clear Roles
14.1 Add labels
kubectl label nodes dev-cluster-m02 workload=dev
kubectl label nodes dev-cluster-m03 workload=test
14.2 Add taints
kubectl taint nodes dev-cluster-m02 dedicated=dev:NoSchedule
kubectl taint nodes dev-cluster-m03 dedicated=test:NoSchedule
15. Create the Namespaces
kubectl create namespace dev
kubectl create namespace test
kubectl create namespace headlamp
16. Why Work with YAML Files?
In this lab, resources are not created only through one-line commands. They are saved as YAML files and applied from there. This matters because it helps you understand the declarative model of Kubernetes.
The file structure used in this lab is:
00-namespaces.yaml
10-dev-postgres.yaml
11-dev-adminer.yaml
20-test-postgres.yaml
21-test-adminer.yaml
30-headlamp-raw.yaml
31-headlamp.yaml
The files are applied in this order:
kubectl apply -f 00-namespaces.yaml
kubectl apply -f 10-dev-postgres.yaml
kubectl apply -f 11-dev-adminer.yaml
kubectl apply -f 20-test-postgres.yaml
kubectl apply -f 21-test-adminer.yaml
kubectl apply -f 31-headlamp.yaml
17. The Namespace File
File name: 00-namespaces.yaml
apiVersion: v1
kind: Namespace
metadata:
  name: dev
---
apiVersion: v1
kind: Namespace
metadata:
  name: test
---
apiVersion: v1
kind: Namespace
metadata:
  name: headlamp
18. Dev Environment: PostgreSQL StatefulSet
PostgreSQL is deployed as a StatefulSet, not a Deployment, because a database is a stateful workload.
File name: 10-dev-postgres.yaml
apiVersion: v1
kind: Secret
metadata:
  name: postgres-secret
  namespace: dev
type: Opaque
stringData:
  POSTGRES_DB: appdb
  POSTGRES_USER: appuser
  POSTGRES_PASSWORD: apppass
---
apiVersion: v1
kind: Service
metadata:
  name: postgres
  namespace: dev
spec:
  clusterIP: None
  selector:
    app: postgres
  ports:
    - name: postgres
      port: 5432
      targetPort: 5432
---
apiVersion: apps/v1
kind: StatefulSet
metadata:
  name: postgres
  namespace: dev
spec:
  serviceName: postgres
  replicas: 1
  selector:
    matchLabels:
      app: postgres
  template:
    metadata:
      labels:
        app: postgres
    spec:
      nodeSelector:
        workload: dev
      tolerations:
        - key: "dedicated"
          operator: "Equal"
          value: "dev"
          effect: "NoSchedule"
      containers:
        - name: postgres
          image: postgres:16
          ports:
            - containerPort: 5432
              name: postgres
          envFrom:
            - secretRef:
                name: postgres-secret
          volumeMounts:
            - name: postgres-data
              mountPath: /var/lib/postgresql/data
          readinessProbe:
            exec:
              command:
                - sh
                - -c
                - pg_isready -U "$POSTGRES_USER" -d "$POSTGRES_DB"
            initialDelaySeconds: 10
            periodSeconds: 5
          livenessProbe:
            exec:
              command:
                - sh
                - -c
                - pg_isready -U "$POSTGRES_USER" -d "$POSTGRES_DB"
            initialDelaySeconds: 20
            periodSeconds: 10
  volumeClaimTemplates:
    - metadata:
        name: postgres-data
      spec:
        accessModes:
          - ReadWriteOnce
        resources:
          requests:
            storage: 1Gi
19. Dev Environment: Adminer
File name: 11-dev-adminer.yaml
apiVersion: apps/v1
kind: Deployment
metadata:
  name: adminer
  namespace: dev
spec:
  replicas: 1
  selector:
    matchLabels:
      app: adminer
  template:
    metadata:
      labels:
        app: adminer
    spec:
      nodeSelector:
        workload: dev
      tolerations:
        - key: "dedicated"
          operator: "Equal"
          value: "dev"
          effect: "NoSchedule"
      containers:
        - name: adminer
          image: adminer
          ports:
            - containerPort: 8080
---
apiVersion: v1
kind: Service
metadata:
  name: adminer
  namespace: dev
spec:
  type: NodePort
  selector:
    app: adminer
  ports:
    - port: 8080
      targetPort: 8080
20. Test Environment: PostgreSQL StatefulSet
File name: 20-test-postgres.yaml
apiVersion: v1
kind: Secret
metadata:
  name: postgres-secret
  namespace: test
type: Opaque
stringData:
  POSTGRES_DB: appdb
  POSTGRES_USER: appuser
  POSTGRES_PASSWORD: apppass
---
apiVersion: v1
kind: Service
metadata:
  name: postgres
  namespace: test
spec:
  clusterIP: None
  selector:
    app: postgres
  ports:
    - name: postgres
      port: 5432
      targetPort: 5432
---
apiVersion: apps/v1
kind: StatefulSet
metadata:
  name: postgres
  namespace: test
spec:
  serviceName: postgres
  replicas: 1
  selector:
    matchLabels:
      app: postgres
  template:
    metadata:
      labels:
        app: postgres
    spec:
      nodeSelector:
        workload: test
      tolerations:
        - key: "dedicated"
          operator: "Equal"
          value: "test"
          effect: "NoSchedule"
      containers:
        - name: postgres
          image: postgres:16
          ports:
            - containerPort: 5432
              name: postgres
          envFrom:
            - secretRef:
                name: postgres-secret
          volumeMounts:
            - name: postgres-data
              mountPath: /var/lib/postgresql/data
          readinessProbe:
            exec:
              command:
                - sh
                - -c
                - pg_isready -U "$POSTGRES_USER" -d "$POSTGRES_DB"
            initialDelaySeconds: 10
            periodSeconds: 5
          livenessProbe:
            exec:
              command:
                - sh
                - -c
                - pg_isready -U "$POSTGRES_USER" -d "$POSTGRES_DB"
            initialDelaySeconds: 20
            periodSeconds: 10
  volumeClaimTemplates:
    - metadata:
        name: postgres-data
      spec:
        accessModes:
          - ReadWriteOnce
        resources:
          requests:
            storage: 1Gi
21. Test Environment: Adminer
File name: 21-test-adminer.yaml
apiVersion: apps/v1
kind: Deployment
metadata:
  name: adminer
  namespace: test
spec:
  replicas: 1
  selector:
    matchLabels:
      app: adminer
  template:
    metadata:
      labels:
        app: adminer
    spec:
      nodeSelector:
        workload: test
      tolerations:
        - key: "dedicated"
          operator: "Equal"
          value: "test"
          effect: "NoSchedule"
      containers:
        - name: adminer
          image: adminer
          ports:
            - containerPort: 8080
---
apiVersion: v1
kind: Service
metadata:
  name: adminer
  namespace: test
spec:
  type: NodePort
  selector:
    app: adminer
  ports:
    - port: 8080
      targetPort: 8080
22. Apply the Resources
kubectl apply -f 00-namespaces.yaml
kubectl apply -f 10-dev-postgres.yaml
kubectl apply -f 11-dev-adminer.yaml
kubectl apply -f 20-test-postgres.yaml
kubectl apply -f 21-test-adminer.yaml
23. How We Installed Headlamp
For Headlamp, I did not use the ready-made manifest exactly as it was. I downloaded the raw manifest first, then adjusted the namespace to match the lab structure.
23.1 Download the raw manifest
curl -L https://raw.githubusercontent.com/kubernetes-sigs/headlamp/main/kubernetes-headlamp.yaml -o 30-headlamp-raw.yaml23.2 Change the namespace to headlamp
sed 's/namespace: kube-system/namespace: headlamp/g' 30-headlamp-raw.yaml > 31-headlamp.yaml23.3 Apply the manifest
kubectl apply -f 31-headlamp.yaml24. Why Headlamp Stayed Pending at First
When Headlamp was installed for the first time, the Pod did not start immediately. The problem was not the image or networking. It was a scheduling problem.
All nodes in the cluster were already protected:
- the control plane had its taint
- the dev worker had
dedicated=dev:NoSchedule - the test worker had
dedicated=test:NoSchedule
The Headlamp Pod did not have the toleration required to pass those taints, so the scheduler could not place it anywhere.
The critical command for seeing this was:
kubectl describe pod <headlamp-pod-name> -n headlampThe Events section makes it clear why the Pod remains in Pending.
25. How We Fixed Headlamp
I did not want Headlamp to remain open to the whole cluster. Instead, I used a controlled rule: Headlamp should run only on the test worker node.
The deployment was given two rules:
nodeSelector: workload=testtoleration: dedicated=test:NoSchedule
That way Headlamp:
- did not land on the control plane
- did not land on the dev worker
- could run only on the test worker after tolerating its taint
25.1 Patch command
kubectl patch deployment headlamp -n headlamp --type='merge' -p '
spec:
  template:
    spec:
      nodeSelector:
        workload: test
      tolerations:
        - key: "dedicated"
          operator: "Equal"
          value: "test"
          effect: "NoSchedule"
'
26. How We Got the Headlamp Token
Opening the Headlamp UI is not enough by itself. To inspect the cluster, it still needs a valid identity and permissions. For that, I created a ServiceAccount and granted it access.
26.1 Create the ServiceAccount
kubectl -n headlamp create serviceaccount headlamp-admin26.2 Grant permissions
kubectl create clusterrolebinding headlamp-admin \
  --clusterrole=cluster-admin \
  --serviceaccount=headlamp:headlamp-admin
26.3 Create the token
kubectl create token headlamp-admin -n headlampThe output of this command is the token used on the Headlamp login screen.
27. How We Opened Headlamp
minikube service headlamp -n headlamp -p dev-clusterAfter that, I logged in with the generated token.
28. What We Checked Inside Headlamp
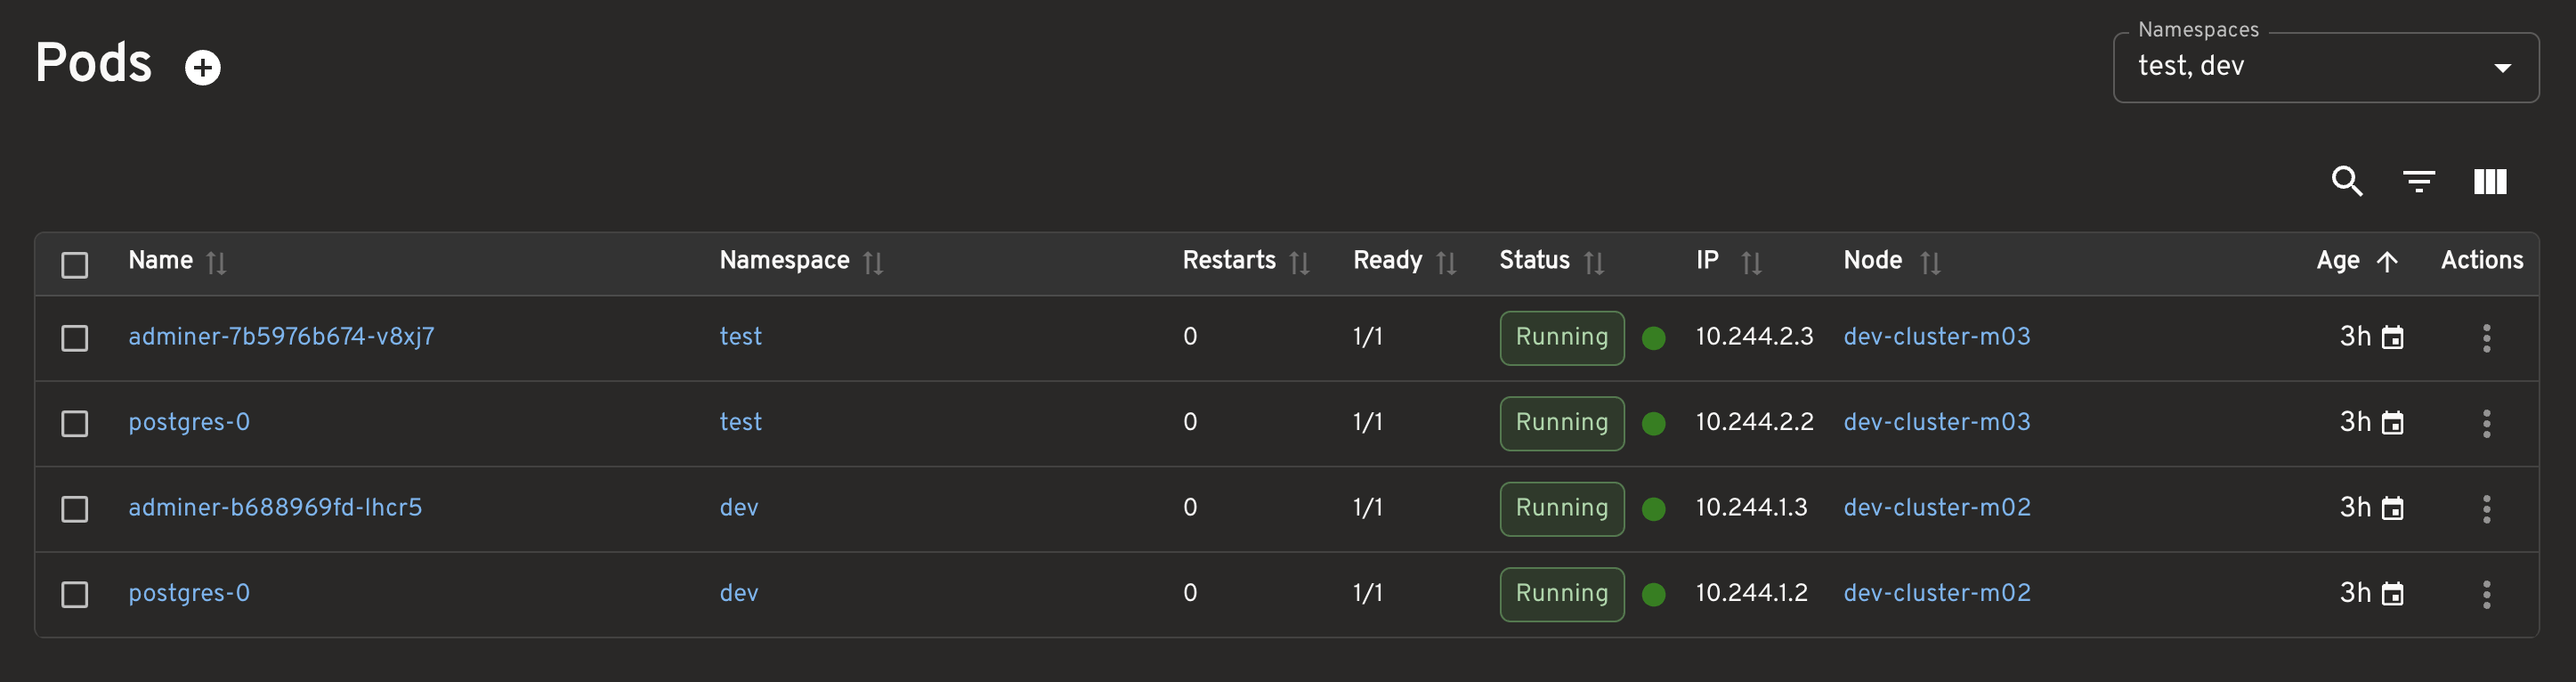
28.1 Pods
I checked the Pods in these namespaces:
devtest
The key thing to confirm was Pod placement:
- test workloads on
dev-cluster-m03 - dev workloads on
dev-cluster-m02
28.2 Namespaces
The namespaces I focused on were:
devtestheadlamp
28.3 Workloads
dev/postgresdev/adminertest/postgrestest/adminerheadlamp/headlamp
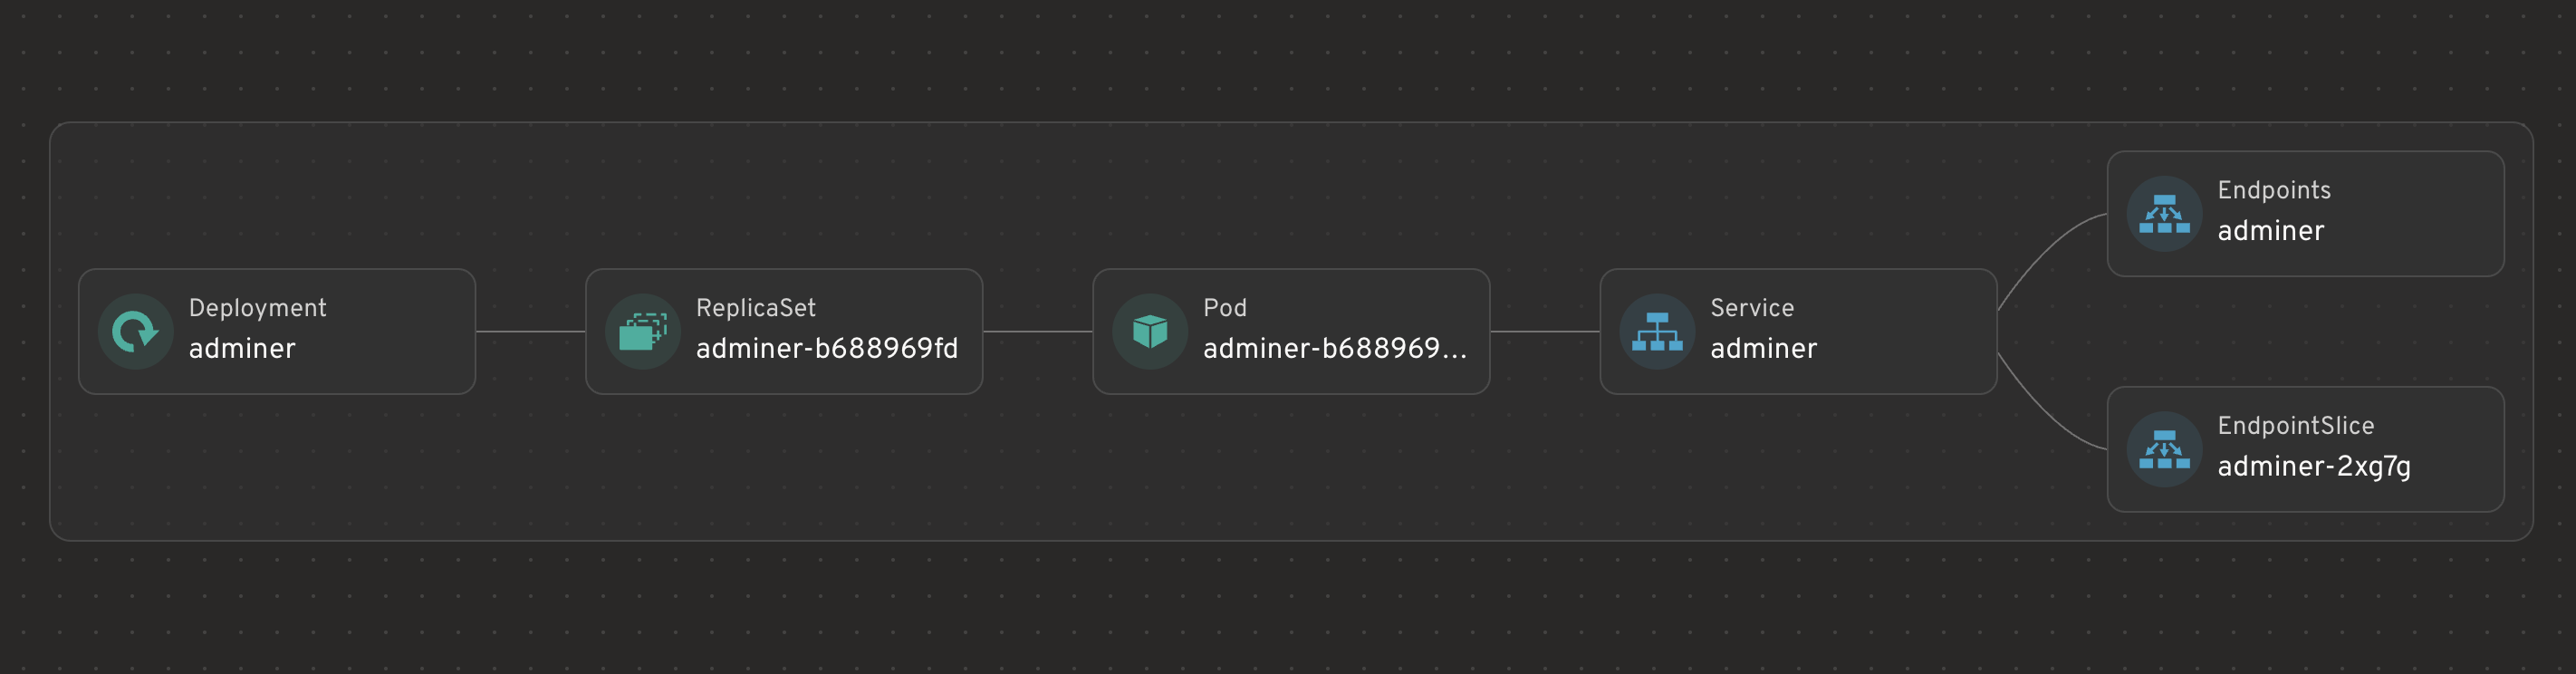
28.4 Adminer resource graph
Adminer shows the classic stateless chain: Deployment → ReplicaSet → Pod → Service → Endpoints. That makes it a good example of how a deployment-based workload behaves.
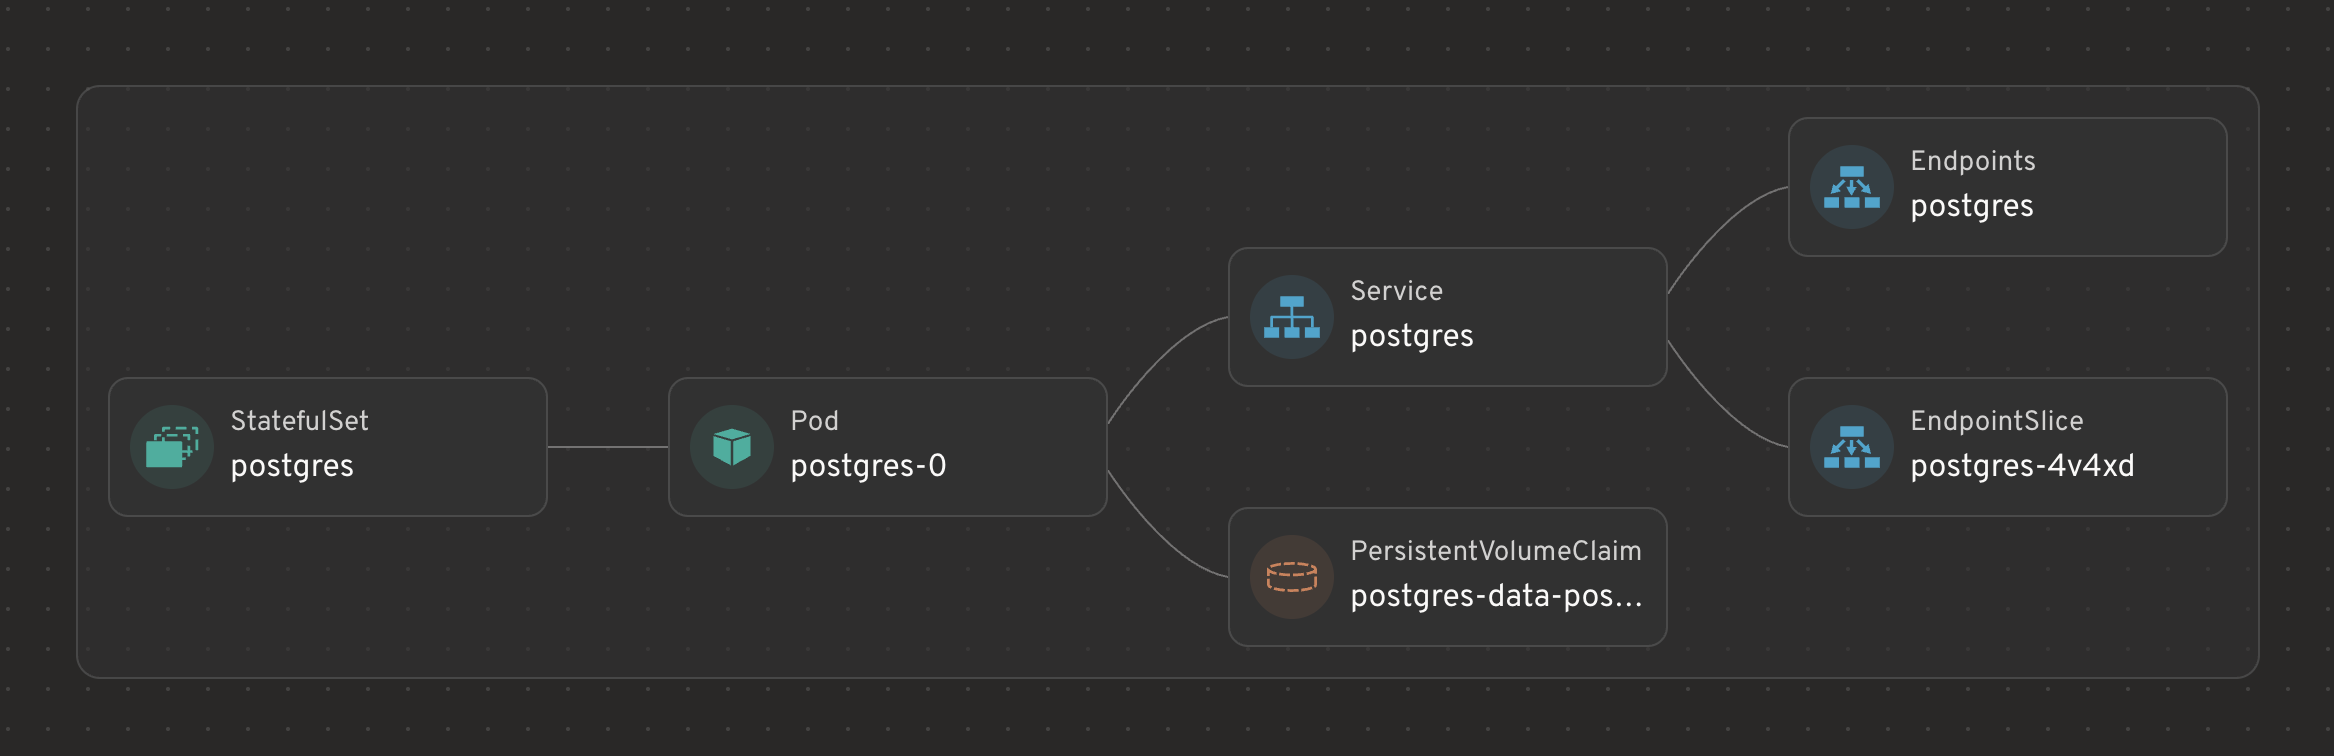
28.5 PostgreSQL resource graph
PostgreSQL shows a different chain: StatefulSet → Pod → Service → PVC. This matters because the goal is not only to run a Pod, but to keep identity and storage relationships stable.
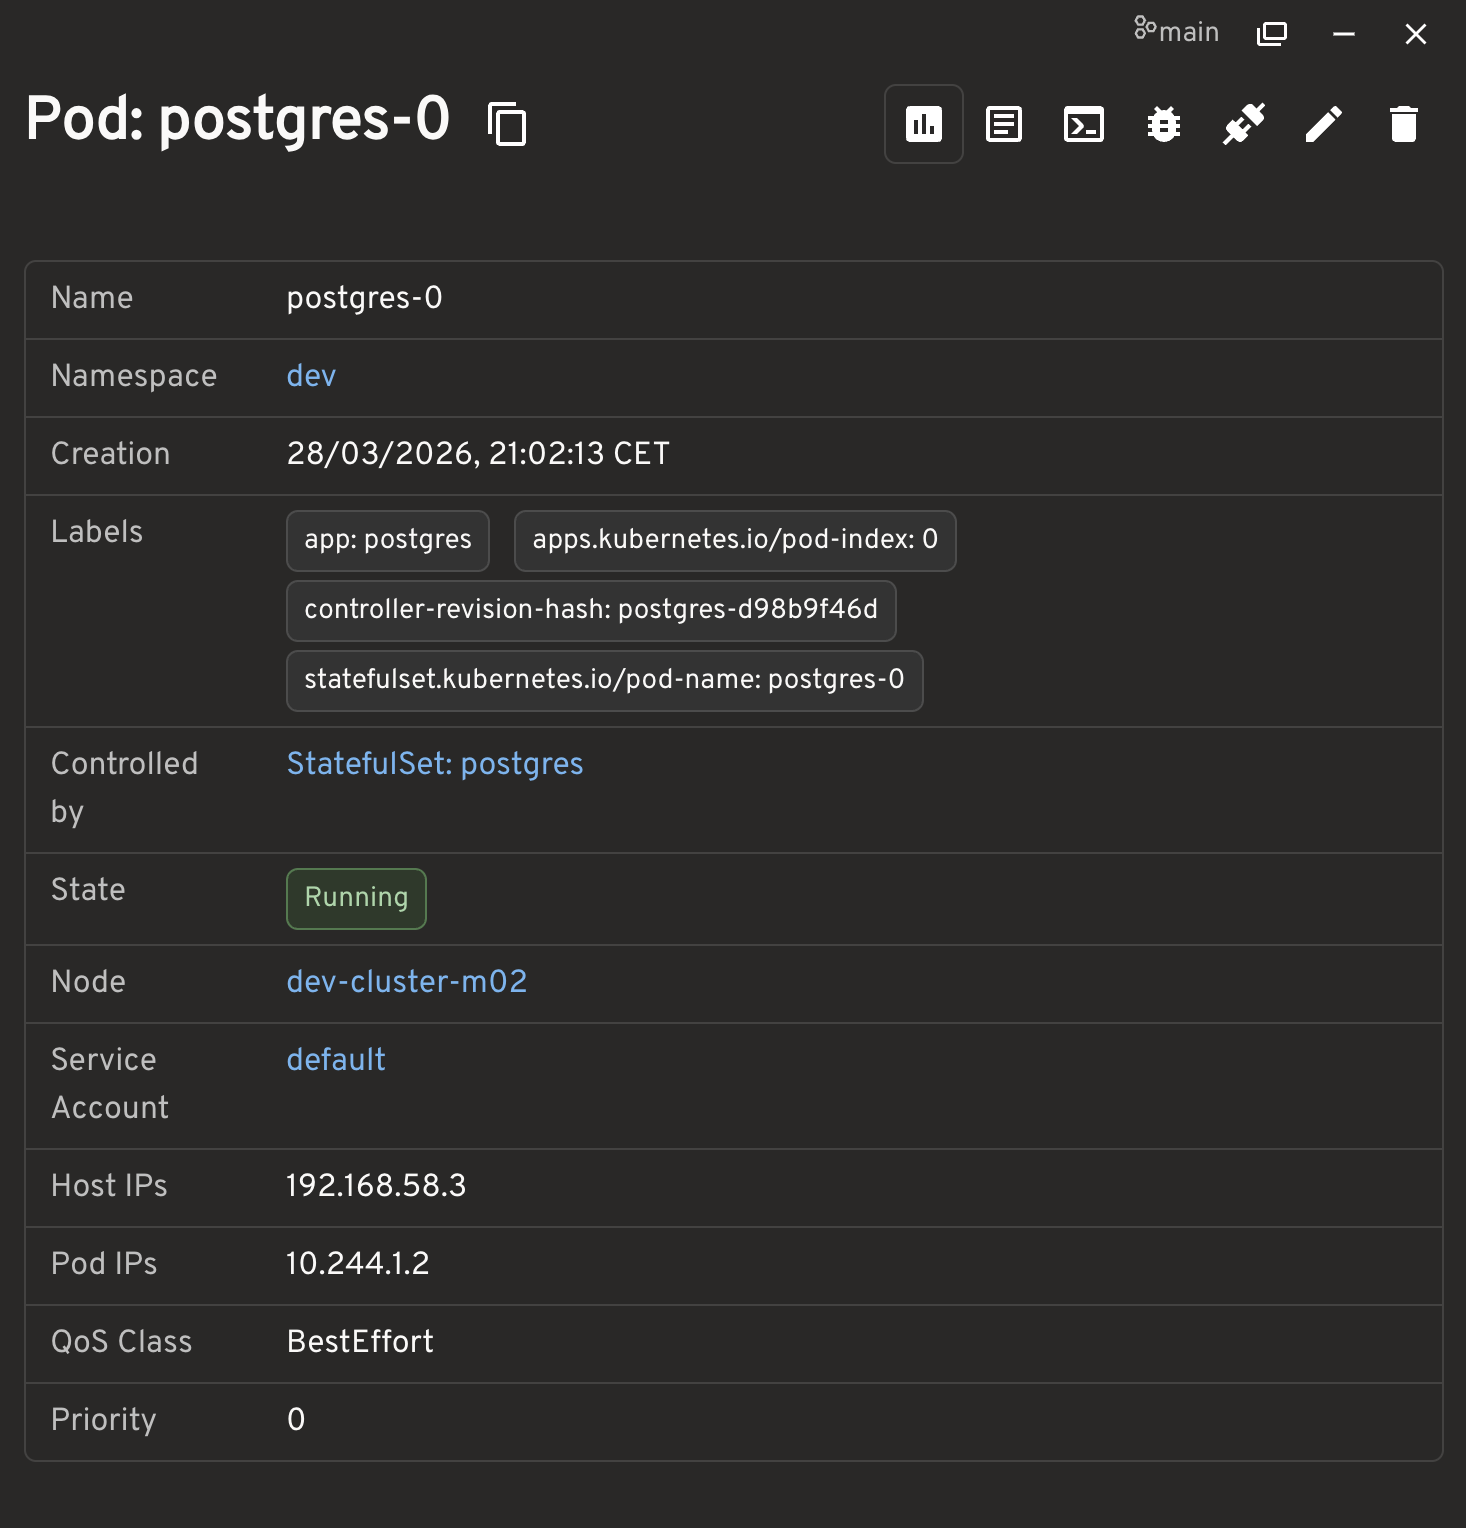
28.6 PostgreSQL Pod details
The Pod detail screen is useful because it shows:
- the stable Pod name, for example
postgres-0 - the namespace
- the controller as
StatefulSet/postgres - the node where the Pod actually landed
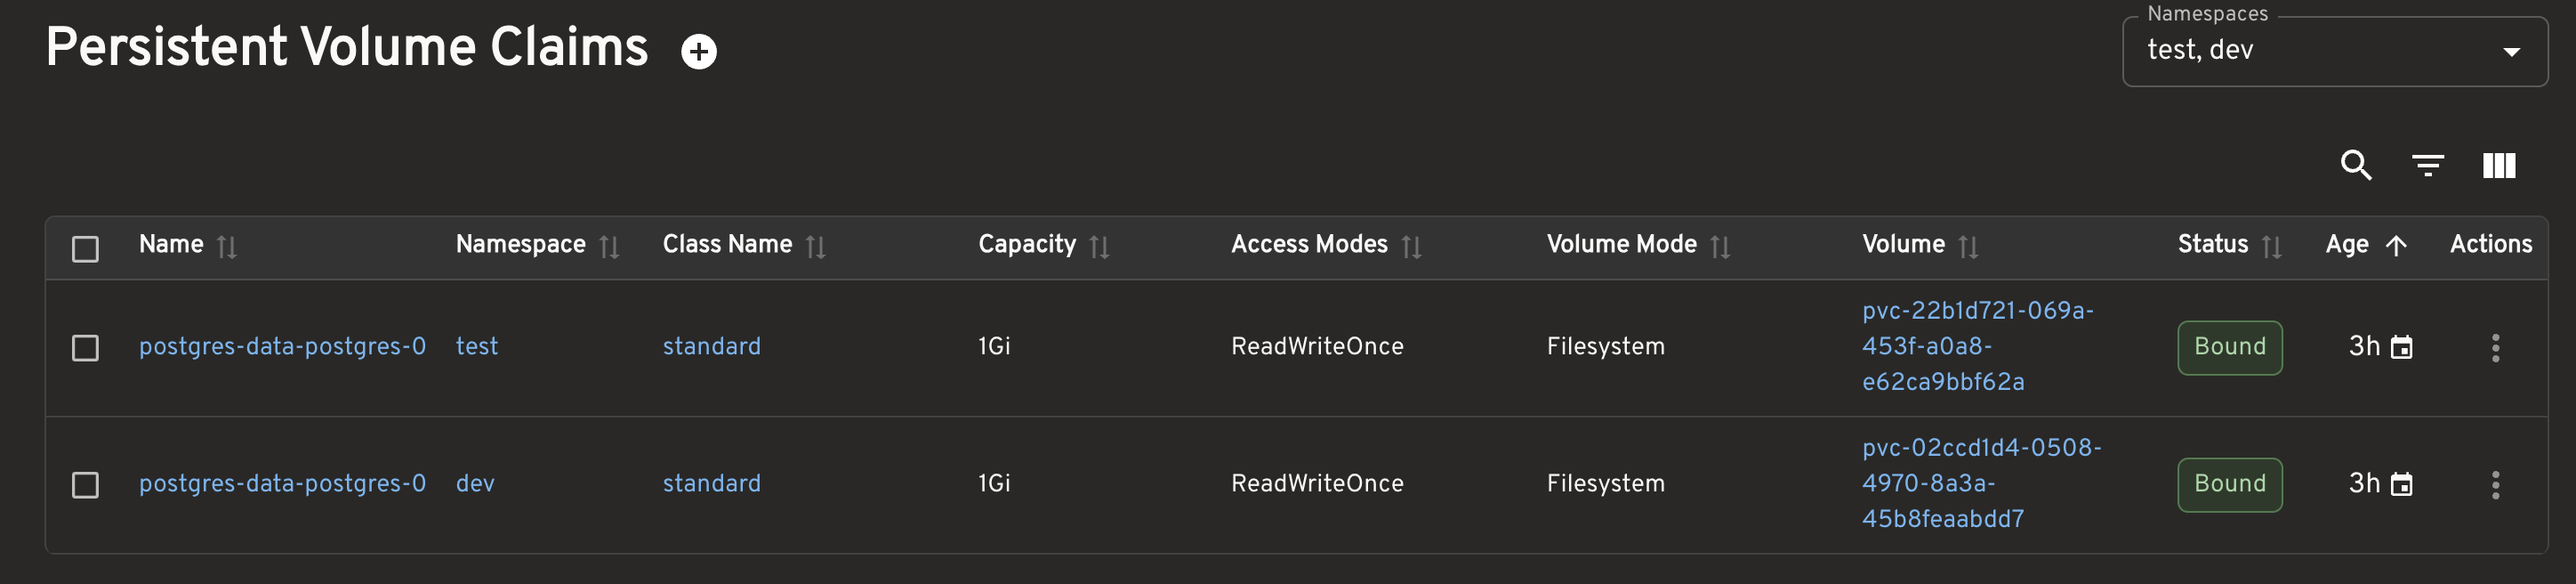
28.7 PVCs
I also checked that the PVCs in both namespaces existed and were in the Bound state.
29. How We Verified Everything
kubectl get pods -A -o wide
kubectl get pvc -A
kubectl get statefulset -A
kubectl get svc -A
The expected result was:
- dev workloads on
dev-cluster-m02 - test workloads on
dev-cluster-m03 - headlamp placed in a controlled way on
dev-cluster-m03 - control plane kept for system components only
30. How We Connected Through Adminer
For the dev environment:
minikube service adminer -n dev --url -p dev-clusterFor the test environment:
minikube service adminer -n test --url -p dev-clusterThe Adminer login values were:
- System: PostgreSQL
- Server:
postgres - Username:
appuser - Password:
apppass - Database:
appdb
31. What This Lab Teaches
By the end of the lab, Kubernetes starts to look different:
- Kubernetes does not just run Pods. It also makes placement decisions.
- Not every node is the same.
- The control plane must be treated separately and protected.
- Namespaces help with organization, but they do not create real node isolation.
- Stateful workloads need StatefulSet.
- Headless Services and PVCs directly affect how the system behaves.
- Tools such as Headlamp make it easier to confirm whether the system behaves as expected.
32. Conclusion
The most important starting point is to stop seeing Kubernetes as a single system that merely runs Pods and to start seeing it as a system of separated roles and explicit rules.
Once that view is in place, concepts such as clusters, nodes, namespaces, labels, nodeSelector, taints, tolerations, StatefulSets, and PVCs stop feeling like disconnected terms. They start to look like parts of the same operating model.
That is the real threshold in learning Kubernetes: moving away from memorizing commands and starting to read system behavior.